1. Fitness Assessment Scoring and Meaning.
The Air Force fitness assessment (FA) is meant to be a health risk marker, serving the same purpose as when testing blood pressure, body temperature, height & weight and/or pulse rate during any medical office visit—if you don’t meet healthy standards, you probably need further assessment by a medical professional. It’s time that you realized that the FA is not a means to punish you; it is a recurring medical assessment to ensure that you are living a lifestyle (e.g., nutrition, fitness, stress management, substance use—intelligent choices) that increases readiness and resilience, and does not put you, your peers, your family or the mission at unnecessary risk. Own this idea, and get with the program.
The Air Force fitness assessment (FA) is meant to be a health risk marker, serving the same purpose as when testing blood pressure, body temperature, height & weight and/or pulse rate during any medical office visit—if you don’t meet healthy standards, you probably need further assessment by a medical professional. It’s time that you realized that the FA is not a means to punish you; it is a recurring medical assessment to ensure that you are living a lifestyle (e.g., nutrition, fitness, stress management, substance use—intelligent choices) that increases readiness and resilience, and does not put you, your peers, your family or the mission at unnecessary risk. Own this idea, and get with the program.
It might surprise you to learn that, if you are not scoring well on the FA, or you otherwise can’t seem to improve your physical performance levels, the reason might be related primarily to excessive stress, such as not sleeping well, or when experiencing friction in a relationship. The fix for this is not (and never will be) more physical training (PT). In fact, you might need to rethink your current PT strategy and train more appropriately.
Related to the idea of the FA as a medical metric, it is scored in favor of the aerobic test of your cardiovascular system: the 1.5 mile run is worth 60 points out of a possible 100 points. Moreover, the abdominal circumference (a/c) test is worth 20 out of the possible 100 points. The horizontal line about your waist is where humans carry the type of body fat (visceral or central adiposity) that interacts with the body in an unhealthy manner. The push up and sit up test components are worth a measly 10 points each. Medically speaking, it is far healthier to have a robust cardiovascular system and carry a minimal amount of visceral body fat than it is to have the strength-endurance required to perform extended moving planks and trunk flexes (push ups and sit ups), and the overall grading of the FA reflects this. Not surprisingly, if you spend adequate time training your run, your a/c tends to fall into a healthy place as well.
1.1.The Run Test.
The 1.5 mile run is a test of your aerobic fitness and a very strong indicator of your overall health. Covering one and one-half miles in the allotted time is not (or, should not be) the goal. Even when meeting this standard, if it means that you need to take a few days off from work to recover from the effort, then you are not “fit”. However, having the capacity to repeat the run test with little need for recovery is the goal of running training. Think about that. The run component is how you earn the most points on the FA but more importantly, a good score in this component is very strongly associated with superior health and function, and a disease-free existence. Maybe you care less about the latter right now, but in a decade or so, diabetes and/or heart problems will begin to cause you a loss of life, limb, and/or eyesight. I know, I know: this won’t happen to you… just run.
Running is a funny thing:
- no other cardiovascular (CV) training carries over well to running.What this means is that to run well AND WITHOUT INJURY, you actually have to run. No amount of spin cycle, elliptical, treadmill running, swimming, bootcamp, or any other CV work is effective at improving injury-free running.
- you hate running because you run too fast. This is an easy fix, but you have to have the requisite discipline and consistently do the work. Testing is testing, but training is training—if you keep the two in their proper place, running is an enjoyable experience.
Passing the run test for males under the age of 30 means that you need to run 1.5 miles in better than 13 minutes, 14 seconds (I know that “passing” is a bit slower, but truly passing this test component means earning a 75th percentile or better: above the dashed line on the score charts). For better than a 13:14 run time, you will earn 44.9 of 60 possible points. If your waist in under 35”, you already have a 64.9 on the FA, without the push ups and sit ups. Can you see the point here?
Moreover, if you run faster than 12:54—around an 8:30 mile—you can enjoy 47.2 points on the run test. That’s almost 3 additional points for not much more work. The increases from there are: at 12:33, you receive 48.2 points; at 12:14 you get 50.2 points, and so forth… the point being that just a slight increase in run speed grants you a lot more points, comparatively.
13 minutes and 14 seconds elapsed across 1.5 miles means that you need to run slightly better than 9 minutes per mile. This is not a fast run by any athletic standards. For older males, the standard grows marginally slower and doesn’t really drop off until you’ve reached the age of 40. So, don’t bet on your advancing age to help your score until you’re 40—depend upon your training.
For females under the age of 30, a 15:50 run time gets you the same passing score of 44.9. And there is the same marginal increase in run times as you get older, but it does not significantly drop off until 40 years of age. Again, the point is that the run component grants you the greatest portion of your overall score, and the minimum standard run time is no superior feat of physical performance. Given these facts, I truly don’t understand why I do not see more individuals running when I am out and about on base!
1.2. The Abdominal Circumference Component.
The a/c component of the test is worth an easy 20 points. Although exercise, especially running, can help with your a/c score, the truth is that only what you do in the kitchen will drastically change your waistline. You can take it or leave it, but if you refuse to change your eating habits, you will remain in a state of body fat that is higher than normal with the increased chance of disease and debilitation. The very best science we have suggests that cardiovascular training actually reduces basal or resting metabolic rate, and does not increase it, as it is commonly thought. Fat loss happens through your nutrition. Please take this extremely critical point.
The a/c component should be a “gimme” for 20 of the available 20 points, but in this day and age of obesity, disease and dysfunction, it is something that, unfortunately, you might actually have to work on. Again, do not fool yourself into thinking that you can just run a few more miles, or do some CrossFit, or some bootcamp class to lose the inches. Your waist is created in the kitchen, and it requires 24 hours/7 days per week of vigilance.
1.3. The Push Up and Sit Up.
The push up and sit up tests are worth at best, a measly 10 points each. More importantly, if you look at the testing standards for your gender and age group, you’ll notice that a passing score (the raw number of repetitions completed above the asterisked line) is quite a few repetitions below a maximum score. And here’s the rub: the extra reps that you perform in an attempt to try and “max out” bring you much closer to metabolic fatigue, and this, at a point right before your run test (which is worth 60/100 points). So, you are trading valuable energy required for the run event to score a few paltry extra points in the push up or sit up event.
Don’t make this trade-off—seek to train your push ups and sit ups such that you have a large buffer between what you are able do in one maximum set and what the testing standards ask for. Then, test by performing a submaximal set far below your trained threshold but well above your minimum standard. What this means if you are a male under the age of 30, is to train yourself to be able to do 50+ push ups and 60+ sit ups in one set—with no time limit. This way, when you perform two very submaximal sets (the difference between your trained state, and a passing score) of push ups and sit ups on the FA, you will be fresh for, and faster in the run. For females under the age of 30, this equates to 25+ for push ups and 50+ for sit ups. Put your ego aside and use an intelligent testing strategy.
2. Run Training.
Basic human physiology tells us that if you want your body to change such that you are stronger and faster, your training program should nudge your current homeostasis in that direction most of the time; and then temporarily sledgehammer your homeostasis for maximum adaptation. There is no way around this physiological fact, though many fail as they try.
The physiology of exercise would refer to this as both a seasonal and polarized training model. “Seasonal” training means that you are running a particular phase of training based on the time of year. There two seasons: the off-season, and the on-season (or simply, “season”). In the AF testing cycle, your off-season would be the time directly after the FA up until about 2-4 weeks prior to your next one (whether it be 6 months or a year). The on-season is the time that you will be peaking for the test—those last few weeks prior to your testing date.
Polarized training refers to the intensity of your exercise: that it is mostly on the ends of the strength-endurance spectrum. If the activity is longer in duration, the loading will be light. If the activity is heavy in loading, the duration will be brief. As an example, longer runs will be much slower in speed (when the load is constant: i.e., your body weight, running slow is a relatively light load), and sprints (heavy load) will be much shorter in duration. During the on-season or peaking cycle, you will attempt to keep both loading and duration relatively higher, to build capacity—but this is very short lived.
You must look at exercise training as what it is: an environmental stimulus that changes your cellular physiology. As a result, most of the time you will be training easier so that your physiology will properly adapt—this is base training. For the very short-term peaking strategies, you will be training very hard—to build on top of the base, the ability to withstand high intensity movement (the anaerobic threshold). Base training builds both the foundational physiology and the ability to absorb higher intensity training. Read that one more time. You can only peak on top of long term base program.
Most folks who learned how to train from a “bro in the gym” or from the Internet, run constant peaking programs without any base training. Under the misinformed guise of, “go hard or go home”, this training method leads to pain, injury, illness, and long-term stress-related symptoms and disease.
Hard training is a short-term peaking strategy that must be intelligently planned after a longer-term, easier training base building strategy. The elite athletes and Olympians peak for 10-12 weeks; you need somewhere between 2 and 4 weeks of peaking. Remember this very important point: you can’t absorb peaking training without base training.
2.1 Before you Run: Breathing
Controlling your breathing is one of the most effective performance increasing and healthful practices that you can implement. Two of the easiest changes that you can start executing right now are:
- breathe with your diaphragm only and not your chest and/or shoulders
- breathe using only your nose: all day, all night, and especially during exercise
Most, if not all of us tend to “over-breathe”, or commit low-level hyperventilation. Moving more air than is metabolically required by the body results in a higher sensitivity to carbon dioxide (CO2). This reduces circulating blood levels of CO2, creating health problems, and leading to a default ventilation rate comprising low-level hyperventilation—an unhealthy positive feedback loop. To help make yourself more tolerant of CO2, you have to reverse this process, and consciously “move less air”, or breathe slower and more controlled.
Repeated daily stress responses (in short: “life”) pattern the habit of using your emergency musculature to ventilate, those muscles that lift the ribcage: your neck, and upper back. Two very important negative influences on your health occur from the habit of breathing with your ribcage:
- The diaphragm atrophies and grows weak, making it difficult-to-impossible to properly stabilize your spine and engage your core (re: eventual low back pain & injury).
- The physical act of ventilating with your ribcage elicits a chronic, low-level stress response (re: inability to relax, disease-state symptoms).
To reestablish proper breathing mechanics, you have to frequently practice breathing but using your diaphragm (the belly-breathing drill) throughout the day. Your sub- & unconscious brain will eventually revert to using diaphragm as the default ventilation mechanics. In summary, inhale by pushing out the belly and not moving the chest or shoulders; exhale by simply relaxing the trunk. Come in to see me for training, if need be.
We, as human animals innately understand something is wrong with mouth-breathing. Farmers know that their animals are having trouble with their health if they are mouth-breathing. Mouth-breathing reduces the anatomical deadspace of the ventilatory system, causing a further reduction in CO2 tolerance. Nasal breathing both conditions the air for the lungs and adds nitric oxide to the mix—a gas that is crucial for health and proper function. Mouth-breathing can lead to symptoms of over-breathing, such as exercise-induced asthma, asthma, allergies, sleep apnea, depression, high anxiety, etc.
To begin on your nasal breathing journey, simply use your nose to breathe. It may be difficult at first, but as you use your nose more often, it will eventually clear. Be vigilant in this process, and again, come see me if you need guidance or assistance.
Next, you actually have to run if your running is to improve. So, where is your start point? Are you currently running, pain-free for at least 30 min, 3 times per week? No? Well, this is the point that we need to get you to.
2.1.1. Before you Run: Technique
There is a large strength component to running. Running is a series of single-legged stances that you dynamically (changes in position) enter into and jump out of—you catch and throw your body’s weight on one leg at a time, on average, 2000 times per mile. If your technique and postural strength are not up to par, you might as well run straight into a wall. To improve technique and so too postural strength, you have to pay attention to each and every footstep along the way. This means that you cannot zone out to your favorite music for an hour. If you are experiencing running related pain, you might want to pay attention to this section.
The number one, and vitally important reason of adjusting running technique is to “decrease to the very minimum, the impact of the collision between your foot and the earth”.
I cannot overemphasize, or scream this in your face loud enough. The following technical changes that everyone must attend to while running all revolve around reducing the impact of your footsteps. This is critical to pain & injury-free running. The only other training variable that you need to give caution is accumulating too much volume (distance or duration) before you’re ready to absorb it. You ready yourself for increased volume absorption by—wait for it—slowly increasing your running volume over time. Although this is a very individual process, I’ve provided a general Return-to-Run template below. You will need to adjust this based on your training and medical history, and your state of health. Make an appointment with me to review your case. Now, onto the running technique…
To facilitate good breathing mechanics and proper posture, you should be standing up straight while running. If there is any forward lean at all, it will be at the ankles. (Some running methods prescribe a slight forward lean that, theoretically, makes use of gravity to help you move forward—you essentially, fall and catch yourself. This technique is not supported by science, nor is it criticized, but it doesn’t affect the main idea with my method: to ease the crash of your foot into the earth. Headwinds and hills will dictate ankle lean.) Your hips will be out, underneath your head, which is fixed so that your eyes can look forward. Your knees will be more bent than you think, such that you sort of feel like you are “sitting in” to each step. Your arms should be carried longer so that their weight is relatively increased, making it easier to use them to drive your legs. Your forward motion should come from the naval area—that is, you should feel like you are leading the movement with your abdomen, even being pulled forward from this area.
Most importantly, keep your strides shorter and your feet moving quickly. And step as if you are running across a field of dried out twigs, trying not to make noise. Another way to say this is: “run light”. Just as an aircraft noses up in for a landing, pull up—ever so slightly—on your foot before it lands. Use your arms to drive your legs. Lastly, your footstrike should be somewhere between a flat foot and midfoot, close to underneath your center of gravity, and loading to the front (the calf). You can see this difference for yourself: stand tall with feet together and lean back at the ankles until you feel your bodyweight in your heels. Then, lean forward at the ankles until you feel your bodyweight in your calves. This last action is the proper position and loading of your foot while running. Seek to do this.
If you are not accustomed to running, especially with greater flexion at the knee, you will not be able to maintain this technique and posture for very long at first—but you will grow stronger. Be patient: when you lose your posture while running, continue with the remainder of your aerobic training session with a brisk walk, also paying attention to your technique (which is much like the running gait with the exceptions that your knees are bent far less and your footstrike is closer to the heel). Use this run-walk formula to build both postural strength and technique over time. You are still getting an aerobic benefit from briskly walking. As long as the trend is favoring toward more running over time, you are properly progressing with your training.
2.2 Return-to-Run
A basic return-to-run template is designed to take
you from the couch to running several times per week for 30 min each. It simply begins with a total of 30 minutes
of locomotive activity (walking & running) that has you walking more in the
beginning, and slowly increasing your time running while decreasing your time walking. This should be a slow and
gradual process that, if rushed, can leave you with an overuse injury. Here’s my very simple and logical example of
why you should increase running slowly: think about how much you are actually
on your feet. Now, in addition to the
probably less than what you should be spending erect and on your feet, you are
about include a focused and large impact (in some cases, several times your
body weight) to your weight bearing limbs, joints and soft tissue. Don’t ignore this warning, and go slow
including running into your lifestyle.
Take about 10-12 weeks, training at 3 times per week:
|
Week 1 Mon: 4 min walk / 1 min run x 6 Wed: 4 min walk / 1 min run x 6 Fri: 4 min walk / 1 min run x 6 |
Week 7 Mon: 1 min walk / 4 min run x 6 Wed: 2 min walk / 3 min run x 6 Fri: 2 min walk / 3 min run x 6 |
|
Week 2 Mon: 3 min walk / 2 min run x 6 Wed: 4 min walk / 1 min run x 6 Fri: 3 min walk / 2 min run x 6 |
Week 8 Mon: 1 min walk / 4 min run x 6 Wed: 2 min walk / 3 min run x 6 Fri: 1 min walk / 4 min run x 6 = 30 min total |
|
Week 3 Mon: 3 min walk / 2 min run x 6 Wed: 3 min walk / 2 min run x 6 Fri: 3 min walk / 2 min run x 6 |
Week 9 Mon: 1 min walk / 4 min run x 6 Wed: 1 min walk / 4 min run x 6 Fri: 1 min walk / 4 min run x 6 |
|
Week 4 Mon: 2 min walk / 3 min run x 6 Wed: 3 min walk / 2 min run x 6 Fri: 3 min walk / 2 min run x 6 |
Week 10 Mon: 30 min run Wed: 1 min walk / 4 min run x 6 Fri: 1 min walk / 4 min run x 6 |
|
Week 5 Mon: 2 min walk / 3 min run x 6 Wed: 3 min walk / 2 min run x 6 Fri: 2 min walk / 3 min run x 6 |
Week 11 Mon: 30 min run Wed: 1 min walk / 4 min run x 6 Fri: 30 min run |
|
Week 6 Mon: 2 min walk / 3 min run x 6 Wed: 2 min walk / 3 min run x 6 Fri: 2 min walk / 3 min run x 6 |
Week 12 Mon: 30 min run Wed: 30 min run Fri: 30 min run |
… or something with a very gradual progression as described above. Make sure you are walking briskly during the walk periods, and running—jogging—just enough during the running periods. Following your nose is a good metric: if youcan’t maintain nasal breathing during your run periods, you are running too fast; so slow down.
Follow your body: if you feel some overuse discomfort, it is ok to make this a longer process and back off on some of the running. Note also that your running at this point should be what you might call “jogging”—just a tad faster than your brisk walk. You are hardening your body to be able to withstand the intense forces of running—again, take your time with this phase. You have to give yourself permission to “run slow”, as this is how you best create the environment in the body for injury-free adaptation. Running slow is far better than not running at all.
2.3 Long-Term Running Training: aka Base Training.
If you’re already able to run for 30 min, 3 times per week (or you just completed a return-to-run program), it is now time to increase your volume. The 1.5 mile run may seem like a short distance, comparatively, but you must understand that the velocity with which you have to maintain in order to score well in this event can only be produced by a robust aerobic energy system; and the only way to increase the capacity of your aerobic system is to do aerobic work, or, to run at low speeds for lots of volume. There is no way to circumvent this process.
Long-term success in the 1.5 mile run requires year-round, almost daily running at comfortable speeds that allow
you to nasal breathe only, and enjoy the scenery. The absolute minimum frequency that you should
train to improve your aerobic capacity (and thus, the run) is 3 sessions per week lasting 45-60 min each… this is the absolute minimum. Trust me on this, or, I’ll see you in my
office when you fail to meet the run standards.
So, from the 30 min sessions, 3 times per week that the return-to-run
program ended on, you will slowly increase your volume until you are running 3-5 times per week for 45-60 min each, with one long run of over 60 min. You can make a bit larger increase in volume
now than when you were starting from the couch, but still, make this process a gradual one. From 3 sessions of 30 min each, we’ll proceed:
|
Week 1 Mon: 30 min run Wed: 30 min run Fri: 30 min run |
Week 6 Mon: 45 min run Wed: 30 min run Fri: 30 min run Sat: 60 min run |
|
Week 2 Mon: 30 min run Wed: 30 min run Fri: 45 min run |
Week 7 Mon: 60 min run Wed: 30 min run Fri: 30 min run Sat: 60 min run |
|
Week 3 Mon: 30 min run Wed: 30 min run Fri: 15 min run Sat: 45 min run |
Week 8 Mon: 60 min run Wed: 45 min run Fri: 30 min run Sat: 60 min run |
|
Week 4 Mon: 45 min run Wed: 30 min run Fri: 15 min run Sat: 60 min run |
Week 9 Mon: 60 min run Wed: 45 min run Fri: 45 min run Sat: 60 min run |
|
Week 5 Mon: 45 min run Wed: 30 min run Fri: 20 min run Sat: 60 min run |
Week 10 Mon: 60 min run Wed: 45 min run Fri: 45 min run Sat: 90 min run |
… or something like that, again, following your body’s wishes over your ego. This easy run program of high volume and low intensity can be sustained—injury-free—for years. And, you can continually make small improvements in cardiovascular health, aerobic system function, and run performance for years. The idea here is to run faster at the same intensity (your perceived rate of exertion) for the same durations, and not to keep increasing the duration or intensity.
“Faster” speeds come naturally on this program as your health improves. This is a slow process: do not expect your speed at this intensity to significantly increase after only 6 months of training. Just do the work. If you are using your nasal breathing to guide your runs, the sensations don’t change, only your speed. If you’re using something like your pulse rate, you will be running at about 75% of your maximum heart rate every time out. Remember, this is a jog for most people; and a walk/run for others.
So, how do we get from this slow pace of the healthy, long aerobic runs to the fast pace of the test run? I’m glad that you asked… but first, a comment: lightening the load is crucial to your success in physical training, physical testing and overall health. Please jump ahead to section 3 to learn more before you think about increasing the speed of your running.
2.4 Peaking the Run for an Event.
The first, long term step to maximize your run event is to minimize your body fat. Don’t delete this step in your mind to justify eating crap. It requires far less energy to run 1.5 miles if you were 5 lbs lighter; so imagine 10, 15 or even 30lbs of excessive body weight. Again, please read section 3, now.
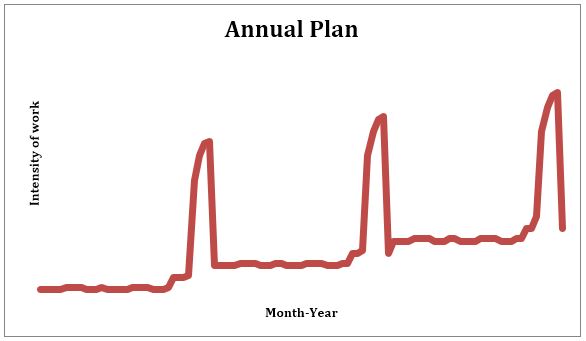
As for run training, the way to bridge the gap from your aerobic runs to your test run is to add tempo runs and intervals. Let me pause here to say that you have to peak for your test off of the platform of aerobic capacity you built over the months of “jogging” at slower speeds. If you decided to skip this step and took the last 5 months off since your last FA, this peaking plan won’t work. Base building will allow you to absorb the high intensity of a peaking program—to try and peak without base training is to invite illness & injury. See the figure below for an illustration. You spend several months training at low intensities, followed by a few weeks of high intensity.
Tempo runs are moderate distance runs that are faster than your base aerobic runs. Intervals are short distance sprints usually performed on a track. When run training 3-5 times per week, you would replace one of the shorter aerobic runs with a tempo run, and one other session with an interval session.
So your week might look like this:
Mon: 60 min aerobic run
Tue: tempo run
Wed: no run/optional 60 min aerobic run
Thur: interval run
Fri: no run/optional 60min aerobic run
Sat: 90 min aerobic run
Note that the long aerobic run is maintained, as is an additional aerobic run. This will help with recovery from the harder work as well as continue to stoke the fires of the fat-burning aerobic system, reducing stress. Make sure that your easy work is “easy”, and that your hard work is “hard”. The largest mistake made by runners is evolving every run to be “moderate”—the easy runs are too hard, and hard runs are too easy. Don’t do this.
You should still be able to maintain nasal breathing during your tempo run, but it will be more labored and forced. A tempo run begins with a 10-15 min aerobic-paced jog followed by 5-20 min of a faster paced run—the tempo. You would then drop back down to your aerobic pace to recover for 5 min or so. Then, increase your speed back to tempo for another 5-20 min. The total session might last for 40-60 min, but the amount of time spent at tempo is 20-40 min. Alternatively, you can warm-up with 10-15 min of aerobic jogging, then run at tempo speeds for 20-40 min straight. Gradually work into this faster run speed. Although this speed is faster than your aerobic run, it is a speed that you can maintain for 40-60 min. Tempo speeds rage from a bit slower than your test/race speed, to a bit faster than your test/race speed.
Do not overuse this very potent dose of training stimulus!
Once per week is sufficient.
Your interval session would be done on the track for short repeats of distances between 300-800m. That is three-quarters to two laps around the outdoor track. Run hard but not at max speed. In a 400m sprint or shorter, you can pretty much run as hard as you can and gut it out. Above 400m, and you have to learn to pace properly to make it through the distance, and this will take some practice doing it. 2-12 intervals, once per week is all you need to improve. If you were running 800s, you might do 2-3 repeats; if you were running 300s, you’d complete 4-6 of them. To do these, you would time yourself in the interval, then rest and recover for 4-6 times that duration. So, if you ran the 400 in 60 sec, you’d rest 4-6 min before the next one. You want to keep your performance of the intervals close to each other—that is, you don’t want your power to fade. So, if you run your first 400 in 60 sec, then rest 5 min, you’ll want your next interval close to 60 sec, as well as any remaining intervals for this session. Begin all sprints from a rolling start, not a dead start.
Once again: Do overuse this very potent dose of training stimulus!
Peaking will only take 3-6 weeks, and starting earlier than this will only cause you to miss your peak and perform below your potential. Note, again, that your peak has to be trained from your base building platform. This allows you to absorb the more intense training. If you try to peak without first building up your aerobic running volume, you will crash and burn. Most folks run their aerobic training too hard and their hard training too easy, causing little-no performance improvements. Run your easy aerobic work—most of the year, “easy”; and run your hard work—very few weeks per year, “hard”.
There must be a reason I am repeating myself…
3. “Waist Training” (Nutrition).
The very best way to improve your test scores without considering training at all is to reduce your body weight. Without studying for an advanced degree in mathematics, it should be easy to understand the concept that the more you weigh, the harder it will be to move, especially for duration. Let’s try it: lie down on the ground and then stand up. Next, lie on the ground and somehow strap 30lbs to your chest—perhaps wear a backpack reversed—and stand up. Was it just as easy? Repeat this drill 20-30 times.
Again, without doing any advanced mathematics, think about what running is: Running is a long series of bounding back and forth into single-legged stances. So, in running, you are economically skipping down the road, hopping from one leg to the other. Another way to say this is that your entire body’s weight is caught and supported by one leg, then you have to jump forward and catch your mass with the other, only to repeat this again—on average, 2000 steps per mile. This means that to complete the 1.5 mile run, you have to jump back and forth on each leg 3000 times (with no regard for speed—faster costs more energy).
When you consider the run event in these terms, can you understand how even 5 lbs of extra body weight can be the difference between passing or failing? Let’s trim your carcass down for improved performance:
Proper human nutrition is best explained by looking through the lens of what actual human food is: plants and animals close to their natural state when you killed them (yes, you kill plants so that you may survive—you owe a debt to them). These are the only two “food groups”, regardless of what the mainstream and conventional, “I have something to sell you”; or, “I haven’t thought this subject through” groups are saying. The closer that you can harvest vegetables and meats to their live state, the more vitamins & minerals they will contain, and the healthier you will be. This is based on scientific and clinical research, and will not fail you.
So, if the only change you made to your food intake is to eliminate all of the overly processed foods commonly and conveniently available, and better source your plants and animals, things will start falling into place for you.
Next, you should know something about the black box in which you are navigating around in, if nothing else so that you may make better choices. Very simply speaking, you have two fuel tanks: a small, dirty-burning sugar tank; and an extremely large, clean-burning fat tank. Everything about healthful living is associated with predominantly using the fat tank: lower levels of inflammation and oxidative stress; less chance of disease and dysfunction; lower incidence of mental disorder and dysfunction; and better physical performance.
There are two ways to switch to the healthful hybrid model of energy management:
- Eating less often.
- Eating less carbohydrates.
Known as fasting, or intermittent fasting, it is simply the practice of spending more time away from food. Don’t over think this or make it more complicated than that. And when you do eat, choose less starches and sugars—stick with vegetables and meats, and don’t discard the associated fats.
Obviously there is a ton of information contained in the details, but this is the overarching theme. If you are eating less often, less total carbohydrates, and are sourcing your foods well and are still not reducing your body fat, then you may start to count the total energy in any manner you wish: portion size, calorie number, etc. But I would advise to go back and see if perhaps you are making errors in judgment with your food choices—it is very difficult to undo longtime conditioned responses.
I might also look into the basic nutrients that even a well sourced diet might be lacking: vitamin C, vitamin B3, vitamin D, and magnesium to name a few. Educate yourself; and please feel free to use me as a resource. It is your life; and your health.
4. Push Up & Sit Up Strength-Endurance Training.
Strength-endurance training as applied to the push up and sit up is a specific type of strength training. That is, to get better at push ups and sit ups, you actually need to do push ups and sit ups; but improving your general strength will go a long way to improving your specific strength. The great thing about push ups and sit ups is that you have them with you all the time, so all that is required is that you drop down and do them.
4.1. General Strength Training.
General strength training does not require a fitness facility full of machines and furniture, for you to get dressed up and travel to, nor for you to block off time for a formal session. It only requires you to lift something that challenges your current strength level. Strength training also requires you to be consistent and patient, using moderate volume and moderate loading. General strength training should either precede or be run concurrently with your specific push up and sit up training.
4.1.1. Bracing.
The very first thing you need to learn with strength training is how to brace. Bracing is little more than creating tension across your entire body, connecting your shoulders to your hips, and posturing and breathing properly while doing so. Bracing stabilizes the spine and readies you for load. Bracing is not much different than “bearing down”, as if you were struggling to move your bowels, but without the intention of actually moving your bowels (so, plug that leak). This ability simply requires practice while you are moving and before long, it will be automatic.
You cannot properly brace unless you breathe properly, mostly because improper breathing leads to atrophy and weakness of the diaphragm, the primarily breathing muscle. Like any muscle, if you don’t use it, it weakens. In this case, it can lead to lower back pain and/or injury, poor breathing mechanics (metabolic issues), and overall system weakness and lack of stamina. Fix your breathing to increase your strength and endurance.
4.1.2. Barbell Training.
Barbell training is the very best way to load. There is no limit to how much weight you can put on the bar, so there is no ceiling to the challenge you can offer. The only two barbell lifts required for general strength are the deadlift and overhead press.
4.1.2.1. The Deadlift
… has you pull a loaded barbell from the ground (or elevated surface) to the erect standing position. Set yourself on the bar so that your feet are about hip width, tense every muscle in your body, grab the bar and press the ground away. In the start position, your hips should be higher than your knees, and your shoulders higher than your hips. Once you stand up, remain tight and do not lean back. It’s not much more difficult than this.
You would perform 3 sets of 3-5 repetitions twice per week with a load that is comfortable but challenging.
4.1.2.2. The Overhead Barbell Press
… should be performed while standing and supported by any furniture. The press begins with the bar racked across the front of your shoulders, elbows underneath the bar, while you lean slightly back. Did I mention that you will be very tight here? As you press the bar straight up and off your shoulders, drive your head and body forward to lock the bar out overhead. Return to the start position.
You would perform 3 sets of 3-5 repetitions thrice per week with a load that is comfortable but challenging.
4.1.3. Kettlebell Training.
The kettlebell is a fantastic tool to begin your strength work. The two lifts we are concerned with is the swing and get up. The swing is a dynamic, quick moving deadlift and the get up is a slower moving, yoga type exercise that has you take the bell from the ground to standing up using your entire body. I will summarize the two lifts below but for an in depth discussion, I will refer you to the excellent book: Kettlebell: Simple & Sinister, by Pavel Tsatsouline.
4.1.3.1. The Swing.
The swing is a bilateral and ballistic hip extension movement that belongs to the hinge movement pattern. It is one of the only two externally loaded lifts that one needs in a minimalist program, giving lots of return for the time and energy investment. The swing comes in many variations and takes considerable time and practice to master.
To perform a swing, take a wider than shoulder-width stance with toes cantered out, standing about a foot behind the kettlebell. Sit back into the hinge while unlocking your knees, grab the kettlebell by the handle, and lean it toward you. Tense up—pack the shoulders, brace the abs, squeeze the glutes, grab the ground with the feet and get ready. You should be looking at a spot on the floor about 20 feet ahead of you.
As you “hike” the kettlebell up and back between your legs, shift your weight back and snap the hips into extension from this hinged position, literally throwing the kettlebell from in between the legs outward to about midsection / chest height. But the height of the bell is unimportant: explosive “hip snap” is what we’re after. Keep your body weight back on your heels. Project the kettlebell forward into a tight plank. Using the latissimus dorsi muscles (your “lats” – those large back muscles that make wings) and arms, the kettlebell’s vertical movement is arrested, and forced back into the hinge position—and the spring is again loaded. After the last repetition, return the kettlebell to the ground after a final back swing by gently parking it as you originally found it.
The most articulate author cannot describe this movement in a manner which will allow for good performance—please find a qualified instructor.
You will work up to performing 10 sets of 10 repetitions 2-4 times per week with a lighter load than you think.
4.1.3.2. The Get Up.
The get up is a slow grinding movement that begins in the supine position, slowly moving from position to position until the individual is standing up straight with the kettlebell overhead. Mastering the get up takes a lot of practice and time and is quite exhausting due to requiring fine-tune control of the entire body under tension for a relatively long amount of time.
The get up is performed by staging a kettlebell on the ground to one side. Lying on your back next to the kettlebell, face the bell in a fetal-like position, drive the joined and extended fingers of the working side hand, palm up, deep into the handle. Using two hands, push the kettlebell out to full arm extension. You should looking down your thumb, as in aiming a firearm. Lock the kettlebell into this position by contracting the big lat muscle on your back. Extend the opposite arm about 45° off midline with the palm facing the ground. Same side leg is bent 90°, opposite side leg is straight—the legs make a nice wide base. Look at the kettlebell.
Build tension and drive the heel of the bent leg into the ground while simultaneously driving the opposite elbow into the ground—lead with the chest and roll up to post on the elbow. Don’t sit straight up—roll to the side. Repack the shoulders and reset your base. Pause here.
Now, press the hand of the posted arm into the ground while pushing the bell off balance towards your hips and “follow it up” into a tall sit, with the hand posted on the ground. Pause here.
Now, lift your hips off the ground by pressing the heel of the bent leg into the ground—you should be posted up on your hand and foot now—and sweep the straight leg underneath and then behind your hips to post on the knee. This three-point stance—foot / knee / hand—should be stable. Pause here.
Now, as you shift your gaze to the horizon, lift your posted hand from the ground until you are “taking a knee”. Close the gap between the legs by moving the posted foot in forward of the posted knee to form a “lunge” position. The toes of the rear foot should be active—dig them into the ground. Keep your torso vertical and press with both legs to stand up to fully erect, kettlebell overhead. Pause here.
Reverse the process until you are lying supine again. From the standing position: opposite leg rear lunge, slowly lowering yourself to a knee—don’t jam your knee into the ground. As you reach for the ground off your knee, shift your gaze back to the bell, and rotate your torso, hinging back on the hip above the posted knee. Now, stabilize the 3-point stance.
Lift the hips, and sweep the leg through to the tall sit. Press the shoulders from your ears. Lower yourself under control to the elbow, press the shoulders from the ears, and lower yourself to your back. Two hands, on the kettlebell, lower it to your belly, and roll it off to the side. That is one-half of one repetition (work the other side now)—congratulations.
A word of caution here: as this is a movement that requires a lot of control, moves through all three planes, and always has a load overhead, let’s practice safety when first starting out: always act as if the bell is very heavy. Use two hands when applicable and respect the load. Practice properly with light weights, and you will execute properly with heavy weights too. It’s not uncommon for males to get up with 70, 90, and 100lbs; and for females to use 50, 60, and even 70lbs, so let’s train properly while it’s still light.
You will work up to performing 6-10 sets of 1 repetition (3-5 each side) 2-4 times per week with a lighter load than you think.
4.2. The Push Up.
The push up belongs to the push movement pattern and is little more than a moving plank. Get into the front leaning rest with your hands roughly under the position of the shoulders, feet together, and build tension. Squeeze the glutes, brace the abs, grab the ground with your hands, corkscrew the shoulders, and pull yourself down as one rigid piece. Pause and return to full arm extension. Your chest should touch the ground but your hips should not—but don’t pike up, keep your body in a tight, straight line. Keep your neck neutral so that your chin about touches the ground with your chest. The elbows should track less than 45° off of midline, and not flare out.
If you are not close to a fitness assessment, you can train push ups almost every day by dropping down 1-3 times per day and performing sets ranging from close to failure, to 50% of your rep max. When closing on a fitness assessment, you will want to get on a more dedicated push up program.
For example, doing multiple sets of push ups per day for the last two weeks prior to your FA. Using 50-70% of your rep max numbers you would do something like the following protocol (based on 30 rep max):
- Mon: 20, 20, 20, 20
- Tue: 23, 23, 23, 23, 23, 23
- Wed: 26, 26, 26, 26
- Thur: 18, 18, 18, 18, 18
- Fri: 25, 25, 25, 25, 25
- Sat: 20, 20, 20, 20, 20, 20
- Sun: Rest
- Mon: 28, 28, 28, 28, 28, 28
- Tue: 22, 22, 22, 22
- Wed: 26, 26, 26, 26, 26
- Thur: 24, 24, 24, 24, 24, 24
- Fri: 20, 20, 20, 20, 20
- Sat: rest
- Sun: rest
- Mon: Test
4.3. The Sit Up.
The sit up is odd exercise that is still being required (as of the time of this writing, JAN 2018) by most U.S. Gov’t agencies as part of a physical fitness testing battery. It is not a good idea to practice sit ups throughout the year as it can and does result in unwanted effects, namely low back pain, for many individuals. The human spine is simply not prepared to be loaded in such a way. That said, sit ups are still required to be tested, so, what to do?
A proper general strength training program will ensure that with few attempts at actually doing sit ups, you will score well on the fitness assessment. Once the core is properly engaged, then trained in its primary task, a few sets of sit ups is all that is required to prep prior to a FA. Proper engagement of the core means that you:
- Breathe functionally (using your diaphragm), and:
- That your unconscious brain sequences muscle firing such that stabilizers are recruited before the primary movers.
This motor skill element can be trained, or rather, practiced by using an assortment of more gentle movement patterns that literally reteach, or retrain the brain to orchestrate movement and posture effectively. As this subject is extremely in-depth, please come see me if you’d like to be assessed and/or learn more.
Once you have your core doing it’s job properly, any general strength training program founded in full body movement will improve your sit ups. All that is left is to prepare for the test starting about 2 weeks out: Drop down and practice your sit ups 2-4 times in this 2 week period, ending at least 48 hours prior to your test.
Omar Nafees says:
I wanted to thank you for writing this article. The compact and bulls eye advice on breathing techniques and diet simplicity are just what I was looking for to step up my training.
Thanks again
Omar